Cracking the Code: Unveiling the Hidden Language of USB HID Keyboards!
By Ken Koon Wong in linux unix raspberry pi kvm tinypilot pikvm r R python usb hid key press report
September 10, 2023
Sending key presses to another device using software that emulates a keyboard, but isn’t a physical keyboard, is a fascinating concept. We understand that in the Linux/Unix environment and with Python, this can be accomplished through low-level programming. But can the R programming language achieve the same feat? If it can, then how does it work?
Interesting Question😎:
What if you want to emulate keystrokes to be sent to another device without actually using a physical keyboard?
You might think, ‘Why would anyone want to type without a keyboard, and why would that be useful?’ Well, there are actually numerous scenarios where this can be incredibly beneficial. Have you heard of Keyboard, Video, Mouse (KVM) technology? It’s a powerful tool for monitoring your server or making changes to BIOS settings, especially in situations where direct access isn’t possible, such as remote workstation setups.
The good news is that there are several products available that provide this convenience. Examples include TinyPilot, PiKVM, and others. These solutions are not only affordable but also offer potential for cost-effective DIY versions.
Now, my primary focus is on answering the initial question: ‘How can we send keystrokes through USB to control another device?’ This has been a puzzling topic for me, and I’ve come across some excellent resources. As a non-computer scientist, I initially struggled to grasp the concept, but I believe I now have a basic understanding of it. What’s even more intriguing is that I’ve discovered (ok, not discovered, but learnt lol) a way to accomplish this using the R programming language 😎. Let’s dive into the details!
Objectives:
- What is Usage ID?
- A Table of Usage ID
- Let’s Put It Into Action
-
How do we do that in
R? - KVMs
- Lessons Learnt
What is Usage ID?
In the realm of USB Human Interface Devices (HID), Usage IDs for keyboards play a pivotal role in defining the various key codes and functions associated with these input devices. These Usage IDs serve as numerical representations that enable communication between a keyboard and a computer system. Each key on a keyboard, from alphanumeric characters to special function keys, is assigned a unique Usage ID. These IDs, typically denoted in hexadecimal format, facilitate the exchange of information about keypresses and releases. Some Usage IDs are reserved for modifier keys, such as Shift, Control, and Alt, while others correspond to specific letters, numbers, or symbols. Understanding and harnessing these Usage IDs is essential for programming, customization, and interfacing with USB HID keyboards, allowing for the creation of dynamic and versatile user experiences in the digital world.
The Structure of A Typical HID Keyboard Report As Defined In The USB Standard.
-
The first byte is for modifier keys like Ctrl, Shift, Alt, etc. Each bit in this byte represents the state (pressed or not pressed) of one of these keys. In the byte, bit 0 (the least significant bit) represents the left Control key, bit 1 represents the left Shift key, bit 2 represents the left Alt key, and so on. The higher-order bits represent the right-side modifier keys in a similar manner.
-
The second byte is typically unused or reserved for OEM (Original Equipment Manufacturer) use. This can vary based on the device and is generally not used for standard keyboard functionality.
-
The last 6 bytes represent the HID key codes of the keys that are currently being pressed. Unlike the modifier keys, these are not bitwise indicators but are byte-level codes, so you can have up to six regular keys being reported as pressed at the same time (this is often referred to as “6-key rollover”).
So, for example, if you wanted to indicate that the ‘A’ key (which has a HID key code of 0x04) is being pressed along with the left Shift key (bit position 1 in the first byte), the report might look something like this in Python bytes notation:
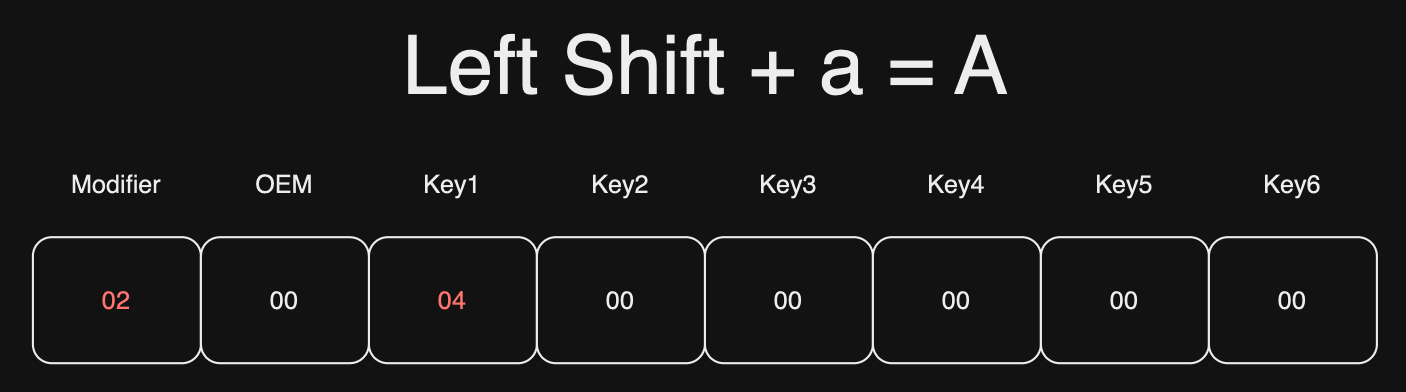
report = b'\x02\x00\x04\x00\x00\x00\x00\x00'
Here:
0x02in the first byte indicates that the left Shift key is being pressed.0x00in the second byte is just filler (unused/OEM byte).0x04in the third byte indicates that the ‘A’ key is being pressed.- The rest are zeros, meaning no other keys are being pressed at the moment.
This report would effectively tell the system that Shift+A is being pressed.
Remember, when you send a key press report, the operating system will usually interpret it as “these keys are being pressed at this moment”. It will continue to interpret them as being pressed until you explicitly tell it that they have been released. For a keyboard, this usually means sending a report where all the bytes are null (i.e., zero), indicating that no keys are being pressed.
release_report = b'\x00\x00\x00\x00\x00\x00\x00\x00'
Otherwise it would be an endless AAAAAAAAAAAAAAAAAA… you get the drill. 🤣.
A Table of Usage ID

Look at Chapter 10 for full table. link. I also made a list in case you want to use it as a dictionary.
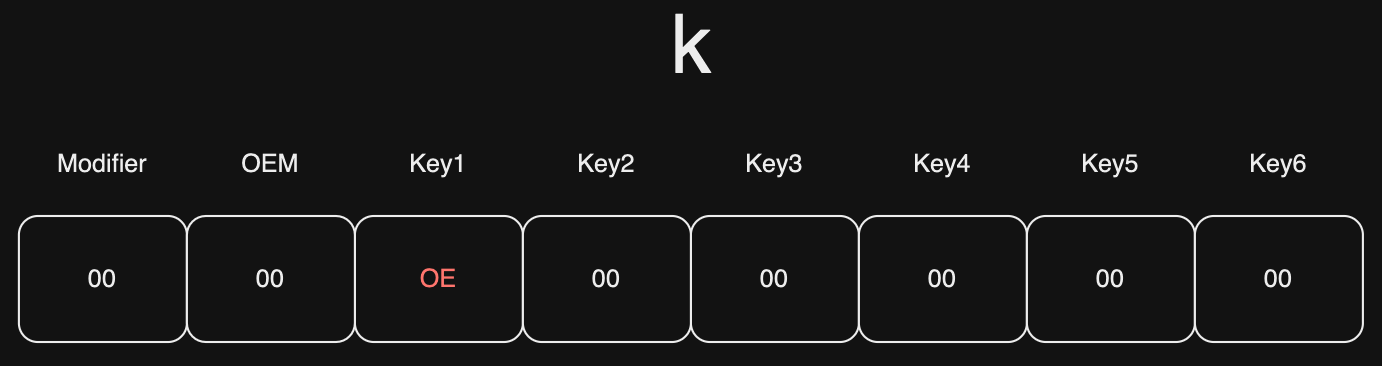
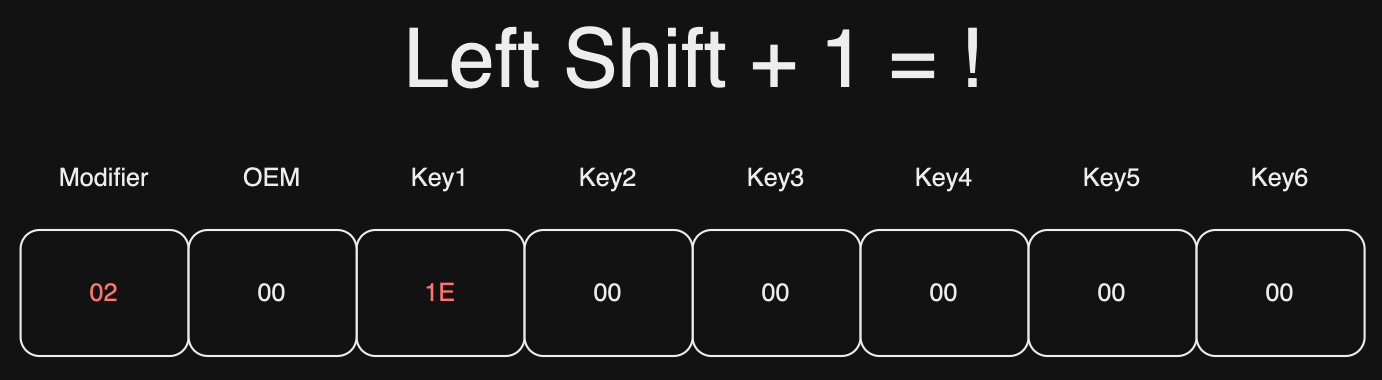
Let’s practice another letter, perhaps with a symbol. How do code the kepress report of k!?
Here’s how you might create the reports in Python bytes notation:
‘k’: 0x0E.
‘!’: 0x1E.
To press ‘k’:
b'\x00\x00\x0E\x00\x00\x00\x00\x00'
To release all keys:
b'\x00\x00\x00\x00\x00\x00\x00\x00'
To press Shift + ‘1’ because ! is same keypress as 1:
b'\x02\x00\x1E\x00\x00\x00\x00\x00'
Let’s Put It Into Action
I’m going to skip the section of setting up the hardware part. You can take a look at
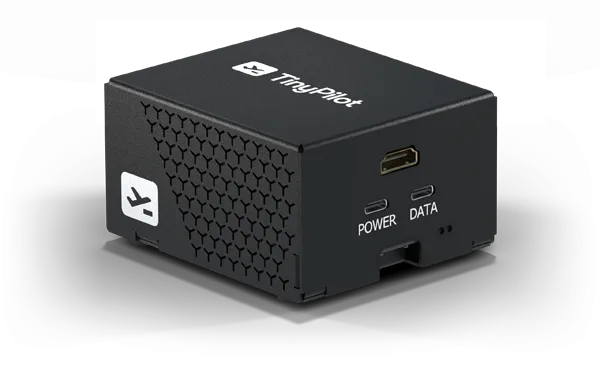
this to set it up from scratch, pretty cool! I actually got a TinyPilot and all the configuration already has been done. Essentially, we want to send those key press reports to /dev/hidg0 in order for it to execute onto the device USB is plugged in.
To send a to /dev/hidg0:
Linux

echo -ne "\0\0\x04\0\0\0\0\0" > /dev/hidg0
Let’s break down the command:
-
-ne: These are options passed to theechocommand:-n: Suppresses the trailing newline character, so there won’t be an automatic newline added after the text.-e: Enables the interpretation of escape sequences in the provided text. This means that escape sequences like\x04will be interpreted.
-
"\0\0\x04\0\0\0\0\0": This is the string that is being echoed. It consists of a series of escape sequences and hexadecimal values:\0represents null bytes (binary 0).\x04represents a specific hexadecimal value (in this case, 0x04).- The rest of the
\0sequences represent null bytes.
-
> /dev/hidg0: Redirects the echoed data to the/dev/hidg0device file, which is associated with an HID gadget.
Python

def write_report(report):
    with open('/dev/hidg0', 'wb') as fd:
        fd.write(report)

a_key_down = b'\x00\x00\x04\x00\x00\x00\x00\x00'
a_key_up = b'\x00\x00\x00\x00\x00\x00\x00\x00'

write_report(a_key_down)
write_report(a_key_up)
Here’s a breakdown of the code:
-
write_report(report): This function takes a binary report (report) as input and writes it to the/dev/hidg0device file in binary mode ('wb'). -
a_key_downanda_key_up: These binary sequences represent the “a” key being pressed down (a_key_down) and released (a_key_up). These sequences are structured according to the HID protocol. -
write_reportsends the key report to/dev/hidg0
How do we do that in R?

# this is to give me 2 seconds to change my window to notepad
Sys.sleep(2)

con <- file("/dev/hidg0", "wb", raw = T)

# press down 'a'
writeBin(as.raw(c(0x00, 0x00, 0x04, 0x00, 0x00, 0x00, 0x00, 0x00)), con)

# release key
writeBin(as.raw(c(0x00, 0x00, 0x00, 0x00, 0x00, 0x00, 0x00, 0x00)), con)

close(con)
Here’s a breakdown of what each part of the code does:
-
con <- file("/dev/hidg0", "wb", raw = T): This line opens a connection to a file located at/dev/hidg0in binary write mode with raw data enabled. -
writeBin(as.raw(c(0x00, 0x00, 0x04, 0x00, 0x00, 0x00, 0x00, 0x00)), con): This line writes a sequence of bytes to the HID device, which corresponds to pressing the ‘a’ key. -
writeBin(as.raw(c(0x00, 0x00, 0x00, 0x00, 0x00, 0x00, 0x00, 0x00)), con): This line writes a sequence of bytes to the HID device, which corresponds to releasing the ‘a’ key. -
close(con): This line closes the connection to the HID device when you’re done sending the keypress and release events.
Then,
- Save the above code as
Rfile, in our caseautologin.R - Run
sudo Rscript autologin.Ron your raspberry pi (my case TinyPilot), which will execute the script - In my case, instead of demonstrating on another device and take a picture/video, I plugged my TinyPilot USB onto the same device I’m currently using
- Click on the
Notepadopened on the side - Wait for the
R scriptto do its thing, pressaand release key.

Et, voila!

Keyboard, Video, and Mouse (KVM) 🎹🎥🐁
Tiny Pilot
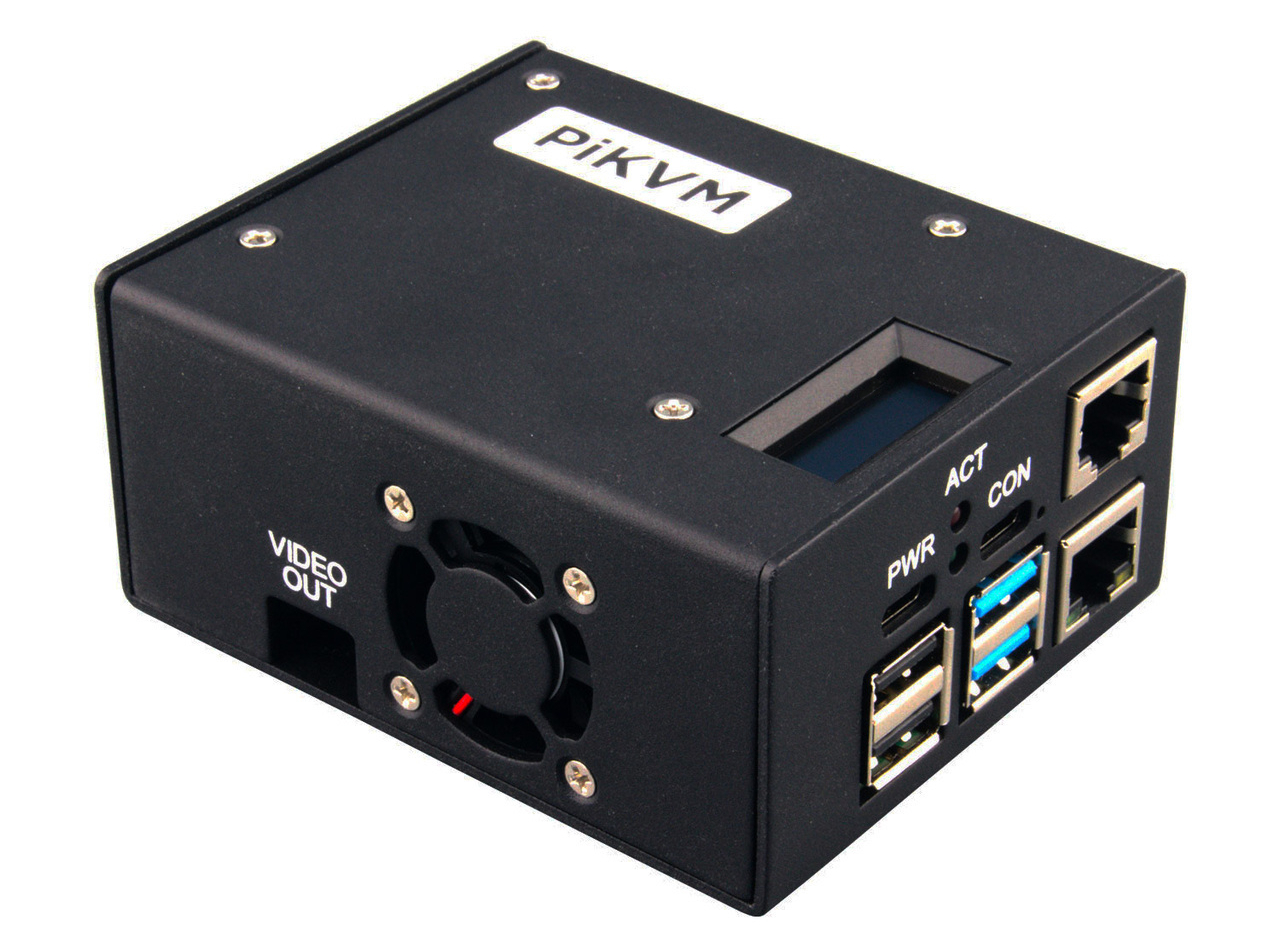
PiKVM
KVM, or Keyboard, Video, Mouse technology, serves as a vital tool in IT and data center environments. It enables efficient management of multiple computers or servers from a single set of input devices, simplifying tasks such as server maintenance, troubleshooting, and remote administration. KVM switches are commonly used in data centers to facilitate server management, remote access, and console redirection. They are also invaluable for virtualization environments, allowing administrators to control virtual machines as if they were physical servers. KVM technology contributes to enhanced security, reduced hardware clutter, energy efficiency, and high availability of critical systems, making it an essential component in modern IT infrastructure.
While TinyPilot is slightly more expensive than PiKVM, both solutions are valuable for fulfilling the purposes of a KVM system. If you prefer a do-it-yourself (DIY) approach, PiKVM offers excellent documentation to guide you through the process. Another valuable resource is KeyMIME. In the reference below, you’ll find a link that provides instructions on turning a Raspberry Pi Zero and a Raspberry Pi 4 into a keyboard, as well as setting up /dev/hidg0.
Acknowledgements:
I learnt so much from these tutorials and this blog is nothing compared to the expertise out there. I must admit, I still don’t know everything about HID. But I do know this works like a charm! And if you haven’t used chatGPT to help you figure things out, you should give it a try. I understand it faster with its help! Thanks personal tutor, chatGPT! Everyday truly is a school day! My next plan is to turn one of my existing Raspberry pi into a keyboard, wish me luck!
Here are some good links for references:
https://www.rmedgar.com/blog/using-rpi-zero-as-keyboard-send-reports/
https://jarnobaselier.nl/python-remote-hid-keystroke-converter/
https://mtlynch.io/key-mime-pi/
Lessons Learnt:
- Learnt how to use
file,writeBininR. - Created a key map for key presses
- Seeing the result really helps in deeper curiosity of “How does this reaallyyyy work”, will be diving deeper to setting up
/dev/hidg0from scratch - Accessing low-level programming in
Ris possible and not cumbersome in this case. We technically can usesystem2orprocessxwithout callingfileandwriteBin.
If you like this article:
- please feel free to send me a comment or visit my other blogs
- please feel free to follow me on twitter, GitHub or Mastodon
- if you would like collaborate please feel free to contact me
- Posted on:
- September 10, 2023
- Length:
- 9 minute read, 1786 words